插件除了基于前台与后台外,还可以作为独立的模块。创建控制器后即可赋予插件前台访问功能。
创建控制器
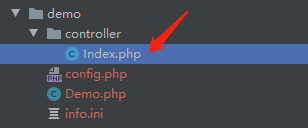
控制器放在controller文件夹下,以demo插件为例,创建首页控制器,路径为:addons/demo/controller/Index.php,如下图
Index.php 代码
<?php

namespace addons\demo\controller;use think\addons\Controller;class Index extends Controller{
    public function index()
    {
        return '首页';
}}浏览器访问地址格式:http://xxx.com/addons/插件名称/控制器名/操作方法
如上demo插件,那么首页控制器访问如下,没写控制器那么访问的是Index控制器,操作方法默认是index
http://xxx.com/addons/demo/index/index
首页默认是Index,操作方法index,那么可以省略,如下即可直接访问到
http://xxx.com/addons/demo/
基类控制器
创建的控制器继承think\addons\Controller基类,文件位置在:vendor/hkcms/cms-addons/src/addons/Controller.php
继承之后有以下属性、方法可以调用,你可根据自己的需要重写某些属性、方法
| 属性名 | 说明 | 使用说明 |
|---|---|---|
| $error_tmpl | 错误页 | 默认是插件视图根目录下的error.html,参考app/common/tpl/error.html |
| $success_tmpl | 成功页 | 同上,只有使用error方法或success方法时有效 |
| $app | 容器变量 | 有路由、配置、路由等实例对象,更多了解:https://www.kancloud.cn/manual/thinkphp6_0/1037489 |
| $request | 请求对象 | 用于获取请求的信息,更多了解:https://www.kancloud.cn/manual/thinkphp6_0/1037518 |
| $name | 插件标识名称 | |
| $addon_path | 当前插件根路径 | |
| $cache | 缓存 | 更多了解:https://www.kancloud.cn/manual/thinkphp6_0/1037634 |
| $site | 站点配置数组 | 即后台站点配置,$this-site['title'] 获取网站名称 |
控制器方法
error方法,输出错误信息,如果是ajax请求则返回的是json数据。如果不是ajax确保视图目录下有error.html文件,你可通过$error_tmpl来指定位置,只能是视图目录下。
// 在控制器里面使用public function test(){
$this->error('出错了');}// $msg 提示信息// $url = 跳转地址// $data = 返回的数据// $wait = 等待几秒后跳转,默认3秒// $header = 头部信息$this->error($msg, $url, $data,$wait, $header)success方法,输出正确提示信息,同上一样。result方法返回指定的数据类型,例如json、xml,默认是json,常用于接口。
public function test(){
    $this->result('操作成功',['lists'=>[]],200, 'json');}
/** * $msg 提示信息 * $data 要返回的数据 * $code 返回的code * $type 返回数据格式 * $header 发送的Header信息 */$this->result($msg = '', $data = [], $code = 200, $type = 'json', array $header = [])
fetch加载模板页面方法
如下,参数一填写模板位置,位置是基于插件视图为基准,另外如果为空默认以当前控制器/操作方法方式找到模板位置。参数二为模板变量参数
/**
 * $template 模板文件名
 *  $vars        模板输出变量
 */$this->fetch($template = '', $vars = [])
以demo插件为例,以下是Index控制器加载模板,参数没有填写那么加载的模板路径为:addons/demo/view/index/test.html
public function test(){
    return $this->fetch();}
加载其他模板,路径为:addons/demo/view/test/index.html
public function test(){
return $this->fetch('test/index');}display渲染模板内容
与fetch方法不同的是,fetch方法时获取传入的文件位置,display方法是直接传入字符串渲染。
/**
 * @param  string $content 模板内容
 * @param  array  $vars    模板输出变量
 */$this->display($content = '', $vars = [])
示例
public function test(){
    $html = '<a>{$test}</a>';
return $this->display($html, ['test'=>111]);}assign模板变量赋值方法
/**
 * @param  mixed $name  要显示的模板变量
 * @param  mixed $value 变量的值
 */$this->assign($name, $value = '')
示例:如下,这样定义好后,在模板页面写入{$txt}即可。
public function test(){
    $txt = '测试';
    $this->assign('txt', $txt);
return $this->fetch();}getInfo获取插件信息
public function test(){
    $ini = $this->getInfo();
dump($ini);}getConfig获取插件配置
true = 获取完整配置,即返回config.php里面的完整数组,false 仅获取键值。
/**
 * @param bool $type 是否获取完整配置
 */$this->getConfig($type = false)
示例
public function test(){
    $config = $this->getConfig();
    dump($config);}
本文关键词: 插件 Hkcms 控制器
希望以上内容对你有所帮助!如果还有其他问题,请随时提问。 各类知识收集 拥有多年CMS企业建站经验,对 iCMS, LeCMS, ClassCMS, Fastadmin, PbootCMS, PHPCMS, 易优CMS, YzmCMS, 讯睿CMS, 极致CMS, Wordpress, HkCMS, YznCMS, WellCMS, ThinkCMF, 等各类cms的相互转化,程序开发,网站制作,bug修复,程序杀毒,插件定制都可以提供最佳解决方案。


